> ## Documentation Index
> Fetch the complete documentation index at: https://docs.straddle.com/llms.txt
> Use this file to discover all available pages before exploring further.
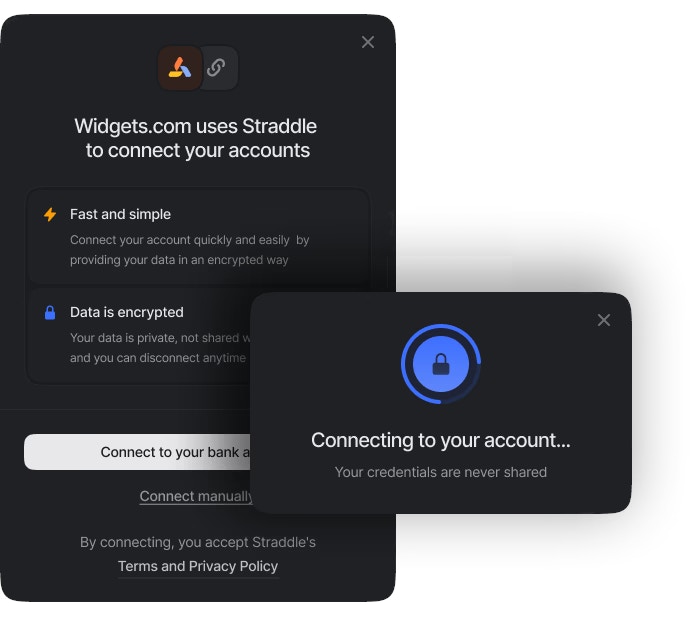
# Bridge widget for connecting bank accounts
> Embed the Straddle Bridge widget in your app for a drop-in UI that securely connects customer bank accounts and returns paykeys for ACH payments.
The Bridge widget allows users to securely connect their bank accounts to your application. Unlike other open banking providers, Straddle handles data exchanges, retrieves bank details and owner information, and generates a secure payment token—without exposing sensitive information to your frontend.
Before interacting with the Bridge widget, ensure you have created a customer in Straddle. For details on customer creation, see the [Customers Guide](/guides/identity/customers).
## Overview
Users click a button or link to initiate the process.
Return the session's `bridge_token` to your client application.
Pass the `bridge_token` to your implementation of Bridge.
Process the response and save the generated [paykey](/guides/bridge/paykeys) after successful account linking.
## Implementation Options
Straddle offers multiple ways to integrate the Widget into your application. Choose the option that best fits your development environment and requirements.
The simplest way to implement the Bridge widget is by using our hosted script. This method is ideal for quick integrations and applications without a specific JavaScript framework.
```html theme={null}
```
For applications using vanilla JavaScript or other frameworks, we offer a JavaScript package that provides more flexibility in implementation.
Check out our [GitHub repository](https://github.com/straddleio/straddle-bridge-client/tree/main/packages/bridge-js) for the latest updates and additional resources.
Install the package:
```bash theme={null}
npm install @straddlecom/bridge-js
```
**or**
```bash theme={null}
yarn add @straddlecom/bridge-js
```
Use the package in your JavaScript code:
```javascript theme={null}
import { straddleBridge } from '@straddlecom/bridge-js'
straddleBridge.init({
mode: 'sandbox', // 'production' or 'sandbox'
token: 'bridge_token', // replace with your token
onSuccess: (payload) => {
console.log('Success event, paykey data is:', payload)
},
onSuccessCTAClicked: () => {
console.log('Success CTA clicked')
},
onClose: () => {
console.log('Straddle widget closed')
},
onLoadError: (error) => {
console.error('Error loading Straddle Bridge Widget', error)
},
style: {
position: 'absolute',
width: '100%',
height: '80%',
top: '200px',
left: '0',
},
debug: true,
})
// To show the widget
straddleBridge.show()
// To hide the widget
straddleBridge.hide()
// To remove the widget from the DOM
straddleBridge.remove()
// To send a custom message to the widget
straddleBridge.send(message)
```
For React applications, we provide a dedicated npm package that offers a more integrated experience with your React components.
Check out our [GitHub repository](https://github.com/straddleio/straddle-bridge-client/tree/main/packages/bridge-react) for the latest updates and additional resources.
Install the package:
```bash theme={null}
npm install @straddlecom/bridge-react
```
**or**
```bash theme={null}
yarn add @straddlecom/bridge-react
```
Use the Bridge component in your React application:
```jsx theme={null}
import React, { useState } from 'react'
import { StraddleBridge } from '@straddlecom/bridge-react'
const StraddleBridgeController = () => {
const [open, setOpen] = useState(true)
const token = 'bridge_token' // replace with your token
const mode = 'sandbox' // 'production' or 'sandbox'
const handleSuccess = (payload) => {
console.log('Success event, paykey data is:', payload)
}
const handleSuccessCTAClicked = () => {
console.log('Success CTA clicked (after a success, when the user clicks the CTA button)')
setOpen(false)
}
const handleClose = () => {
console.log('Straddle widget closed')
}
const handleLoadError = (error) => {
console.error('Error loading Straddle Bridge Widget', error)
}
return (
{open && (
)}
)
}
export default StraddleBridgeController
```
## Implementation Guide
### 1. Generate a Bridge Token
In your backend, [generate a Bridge session token](/api-reference/bridge/session) for the customer:
```bash Generate a Bridge token theme={null}
curl -X POST https://production.straddle.com/v1/bridge/initialize \
-H "Authorization: Bearer YOUR_API_KEY" \
-H "Content-Type: application/json" \
-d '{
"customer_id": "0191ef41-8de5-716c-bfa4-41cd79e85705"
}'
```
```javascript theme={null}
const generateBridgeToken = async (customerId) => {
try {
const res = await fetch('https://api.straddle.com/v1/bridge/initialize', {
method: 'POST',
headers: {
'Authorization': 'Bearer YOUR_API_KEY',
'Content-Type': 'application/json'
},
body: JSON.stringify({ customer_id: customerId })
})
if (!res.ok) throw new Error(`HTTP ${res.status}`)
const json = await res.json()
return json.data.bridge_token
} catch (error) {
console.error('Error generating Bridge token:', error)
throw error
}
}
```
When creating a paykey, the account holder's name is matched against the customer's name. Therefore, when using the Bridge Widget and the MX open banking flow, to get an active paykey, the customer's name must match the MX account holder's name. In sandbox, the MX account holder's name is hardcoded to **Charlie Pouros**.
In sandbox, this behavior can be overriden by specifying a [sandbox outcome](/guides/resources/sandbox-paybybank) in the request.
### 2. Initialize the Widget
Once you have the Bridge token, initialize the widget using your chosen implementation method ([hosted script](#hosted-script), [JavaScript package](#javascript-package), or [React package](#react-package)).
### 3. Handle the Widget Callback
In the `onSuccess` callback, you'll receive a [paykey](/guides/bridge/paykeys) object. This object contains all the necessary information about the connected bank account, without exposing sensitive details to your frontend.
Here's an example of the paykey object you'll receive:
```json theme={null}
{
"data": {
"paykey": "05f5d55cb14f7e8a0ec2e5689376e3b4665efc34834d30995babbd5010b39913",
"bank_data": {
"routing_number": "011000138",
"account_number": "******7890",
"account_type": "checking"
},
"id": "0191ef49-892c-7460-99d1-f5589d7d9989",
"customer_id": "0191ef41-8de5-716c-bfa4-41cd79e85705",
"label": "BANK OF AMERICA, N.A. - *7890",
"source": "straddle",
"institution_name": "BANK OF AMERICA, N.A.",
"status": "active",
"created_at": "2024-09-14T06:47:39.5648743Z",
"updated_at": "2024-09-14T06:47:39.5648746Z"
},
"meta": {
"api_request_id": "243431dd-7deb-4445-820d-55a942ace70f"
},
"response_type": "object"
}
```
Note that sensitive information like the full account number is masked for security reasons.
## Next Steps
After successfully implementing the Bridge widget and generating a paykey, you can start creating payments. For more information, see the following guides:
* [Working with Paykeys](/guides/bridge/paykeys): Learn how to use paykeys for secure account-to-account payments.
* [Creating Payments](/guides/payments/overview): Understand the process of initiating payments using paykeys.
* [Onboarding Customers](/guides/identity/customers): Explore how to manage customer accounts and information.